대부분의 시스템에서는 회원의 관리를 하고 있고, 그에 따른 인증(Authentication)과 인가(Authorization)에 대한 처리를 해주어야 한다. Spring에서는 Spring Security라는 별도의 프레임워크에서 관련된 기능을 제공하고 있는데, 이번에는 Spring Security에 대해서 알아보도록 하겠다.
1. Spring Security란?
💡 [ Spring Security 스프링 시큐리티란? ]
Spring Security는 Spring 기반의 애플리케이션의 보안(인증과 권한, 인가 등)을 담당하는 스프링 하위 프레임워크이다. Spring Security는 '인증'과 '권한'에 대한 부분을 Filter 흐름에 따라 처리하고 있다.
스프링 기반의 애플리케이션의 보안(인증과 권한, 인가 등)을 담당하는 스프링 하위 프레임워크입니다.
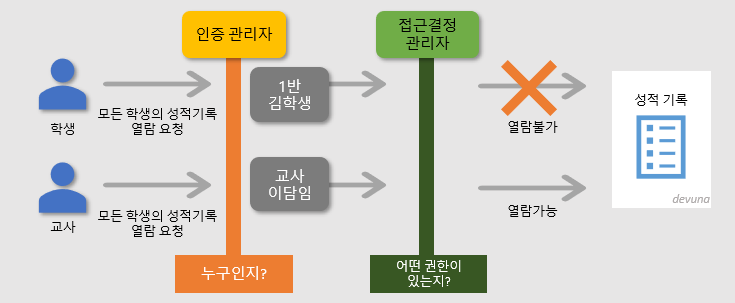
즉 인증(Authenticate, 누구인지?) 과 인가(Authorize, 어떤것을 할 수 있는지?)를 담당하는 프레임워크를 말합니다.
스프링 시큐리티에서는 주로 서블릿 필터(filter)와 이들로 구성된 필터체인으로의 구성된 위임모델을 사용합니다.
그리고 보안과 관련해서 체계적으로 많은 옵션을 제공해주기 때문에 개발자 입장에서는 일일이 보안관련 로직을 작성하지 않아도 된다는 장점이 있습니다.
Filter는 Dispatcher Servlet으로 가기 전에 적용되므로 가장 먼저 URL 요청을 받지만,
Interceptor는 Dispatcher와 Controller사이에 위치한다는 점에서 적용 시기의 차이가 있다.
Spring Security는 보안과 관련해서 체계적으로 많은 옵션을 제공해주기 때문에 개발자 입장에서는 일일이 보안관련 로직을 작성하지 않아도 된다는 장점이 있다.
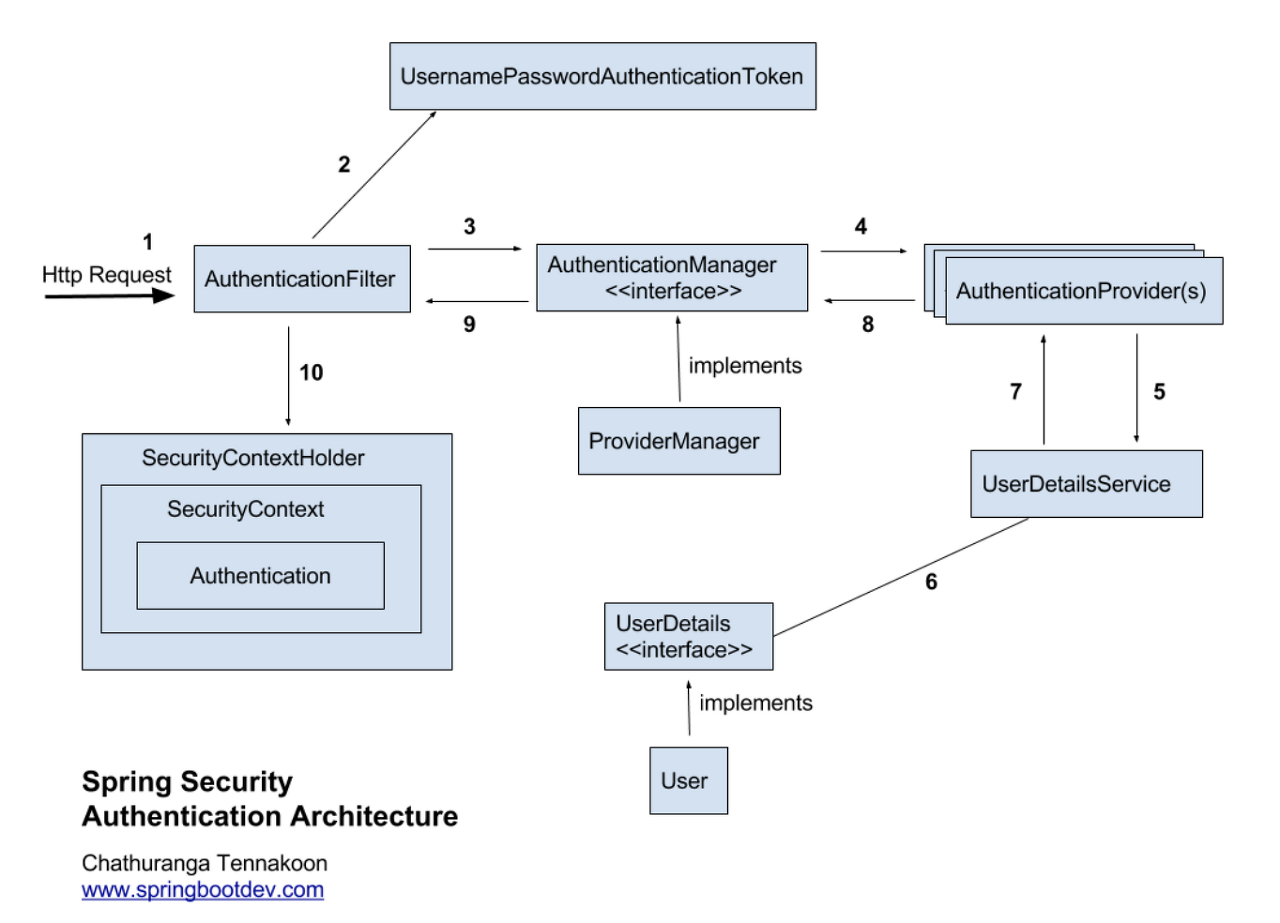
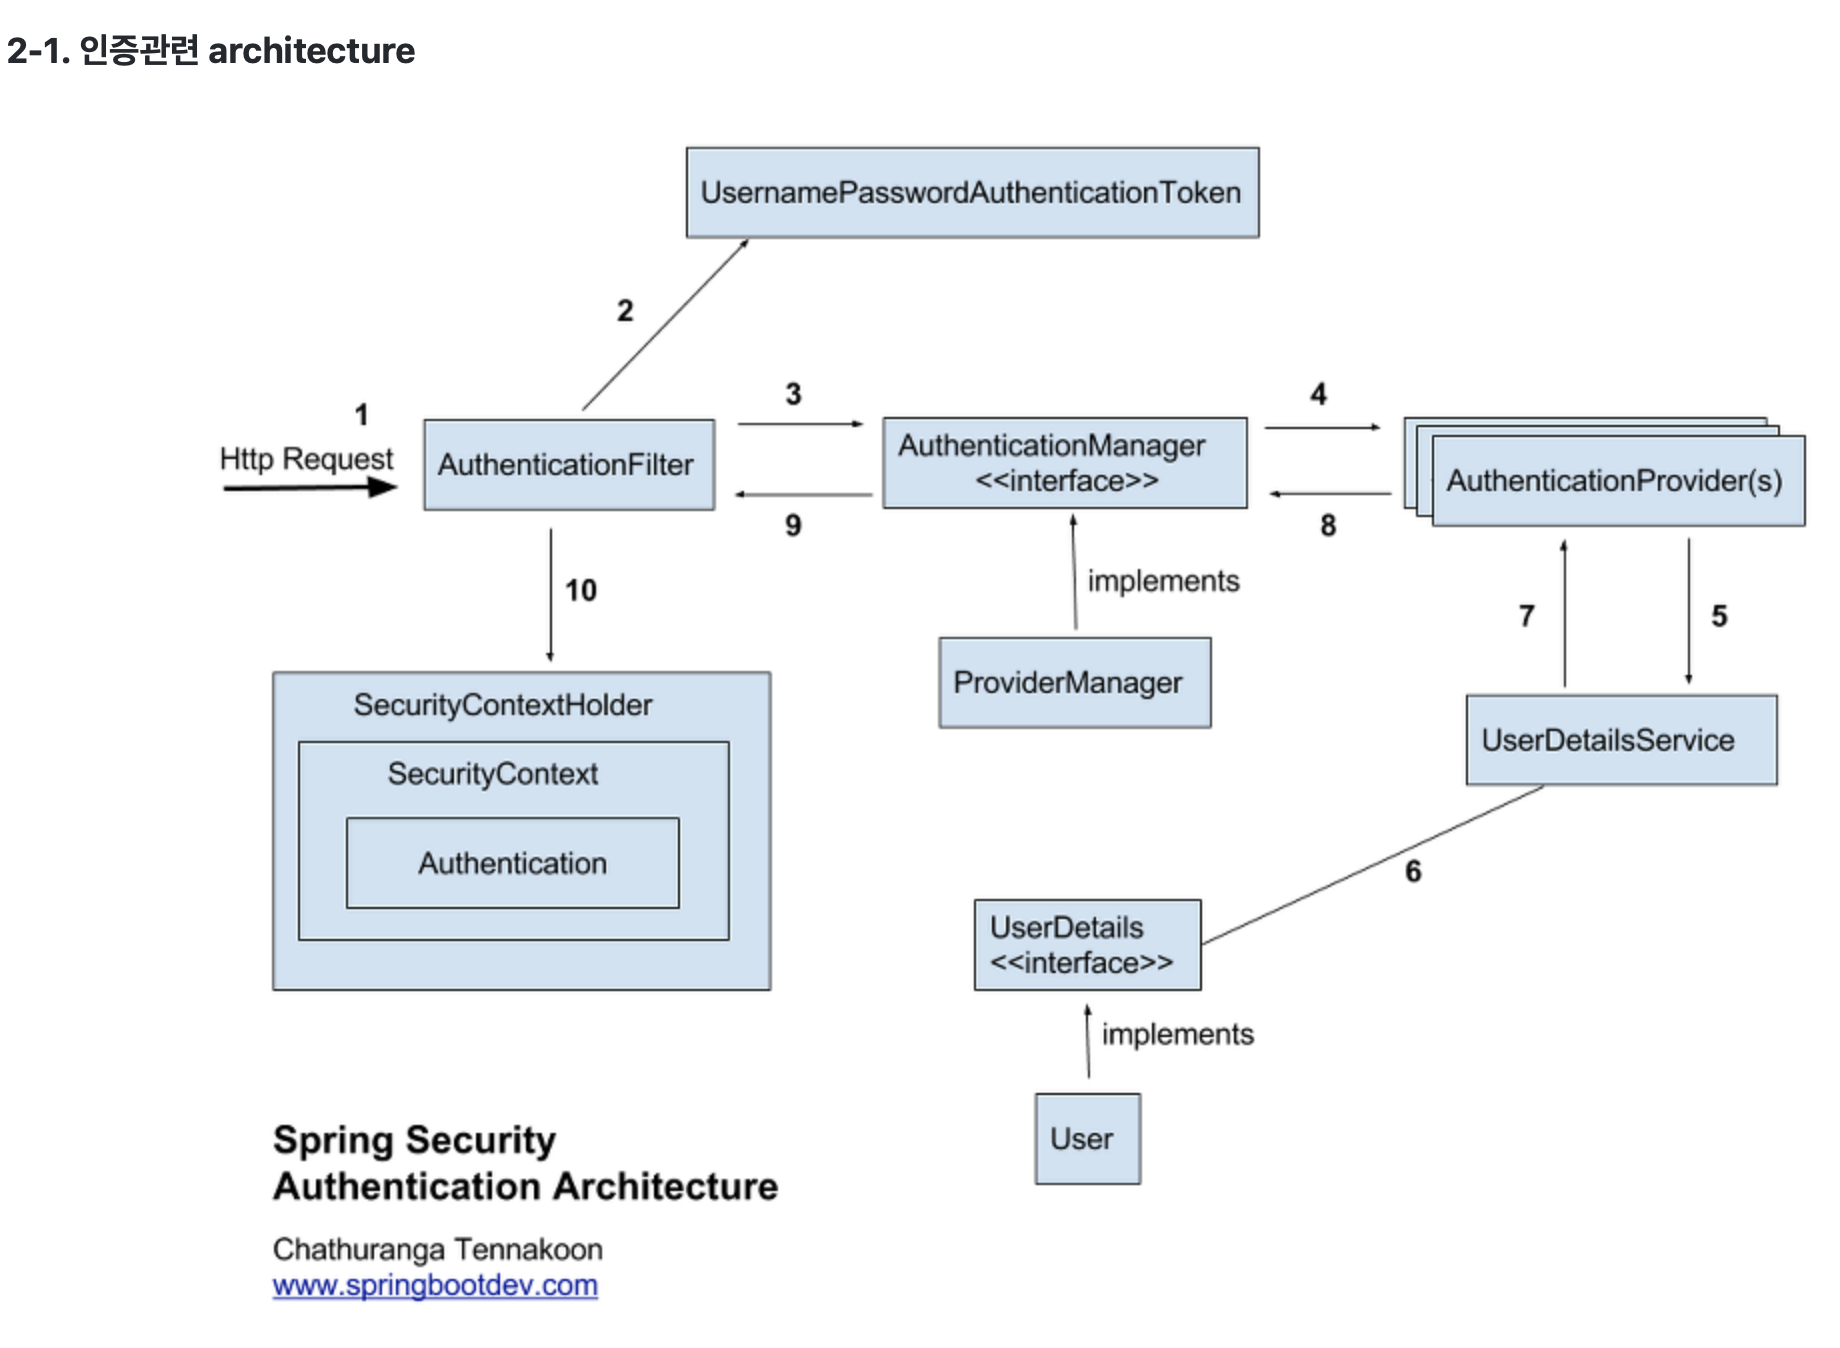
이러한 Spring Security의 아키텍쳐는 아래와 같다. (처리 과정은 다음 글에서 자세히 설명하도록 하겠습니다.)
기본용어
- 접근 주체(Principal) : 보호된 리소스에 접근하는 대상
- 인증(Authentication) : 보호된 리소스에 접근한 대상에 대해 누구인지, 애플리케이션의 작업을 수행해도 되는 주체인지 확인하는 과정(ex. Form 기반 로그인) => 즉, 누구인지?
- 인가(Authorize) : 해당 리소스에 대해 접근 가능한 권한을 가지고 있는지 확인하는 과정(After Authentication, 인증 이후) => 즉, 어떤 것을 할 수 있는지?
- 권한 : 어떠한 리소스에 대한 접근 제한, 모든 리소스는 접근 제어 권한이 걸려있음. 인가 과정에서 해당 리소스에 대한 제한된 최소한의 권한을 가졌는지 확인
[ 인증(Authentication)과 인가(Authorization) ]
- 인증(Authentication): 해당 사용자가 본인이 맞는지를 확인하는 절차
- 인가(Authorization): 인증된 사용자가 요청한 자원에 접근 가능한지를 결정하는 절차

Spring Security는 기본적으로 인증 절차를 거친 후에 인가 절차를 진행하게 되며, 인가 과젱에서 해당 리소스에 대한 접근 권한이 있는지 확인을 하게 된다. Spring Security에서는 이러한 인증과 인가를 위해 Principal을 아이디로, Credential을 비밀번호로 사용하는 Credential 기반의 인증 방식을 사용한다.
- Principal(접근 주체): 보호받는 Resource에 접근하는 대상
- Credential(비밀번호): Resource에 접근하는 대상의 비밀번호
💡 스프링 시큐리티 특징과 구조
- 보안과 관련하여 체계적으로 많은 옵션을 제공하여 편리하게 사용할 수 있음
- Filter 기반으로 동작하여 MVC와 분리하여 관리 및 동작
- 어노테이션을 통한 간단한 설정
- Spring Security는 기본적으로 세션 & 쿠키방식으로 인증
- 어플리케이션의 보안(인증 및 권한)을 담당하는 프레임워크
- Spring Security를 사용하지 않으면
- 자체적으로 세션을 체크해야 한다.
- redirect를 일일이 설정해주어야 한다.
- 로그인 완료 시 다음 화면으로 넘어가기 등
특징
- Filter를 기반으로 동작한다.
- SpringMVC와 분리되어 관리하고 동작할 수 있다.
- bean으로 설정할 수 있다.
- Spring Security 3.2부터 XML 설정을 이용하지 않아도 된다.
용어
- 접근 주체(Principal) : 보호된 대상에 접근하는 유저
- 인증(Authenticate) : 현재 유저가 누구인지 확인(로그인)
- 어플리케이션의 작업을 수행할 수 있는 주체임을 증명한다.
- 인가(Authorize) : 현재 유저의 권한을 검사한다.
- 어떤 페이지, 리소스 등에 접근할 수 있는지를 검사한다.
- 권한 : 인증된 주체가 어플리케이션의 동작을 수행할 수 있도록 허락 되었는지 확인한다.
- 권한 승인이 필요한 부분으로 접근하려면 인증 과정을 통해 주체가 증명 되어야 한다.
- 권한 부여 영역
- 웹 요청 권한
- 메소드 호출 및 도메인 인스턴스에 대한 접근 권한

동작하는 필터의 구조

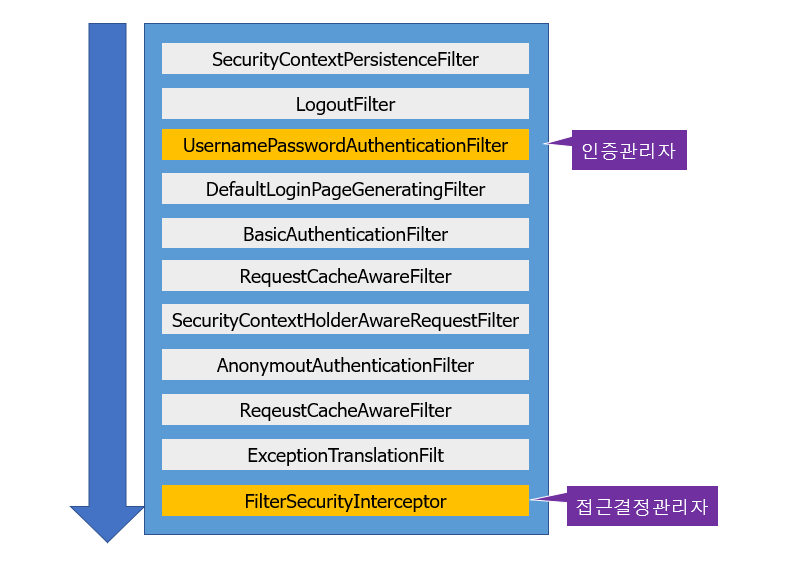
- 인증관리자(Authentication Manager)와 접근 결정 관리자(Access Decision Manager)를 통해 사용자의 리소스 접근을 관리
- 인증 관리자는 UsenamePasswordAuthenticationFilter, 접근 결정 관리자는 FilterSecurityInterceptor가 수행
💡 스프링시큐리티 기본구조

📌 각 필터별 기능 설명
| SecurityContextPersistenceFilter | SecurityContextRepository에서 SecurityContext를 로드하고 저장하는 일을 담당함 |
| LogoutFilter | 로그아웃 URL로 지정된 가상URL에 대한 요청을 감시하고 매칭되는 요청이 있으면 사용자를 로그아웃시킴 |
| UsernamePasswordAuthenticationFilter | 사용자명과 비밀번호로 이뤄진 폼기반 인증에 사용하는 가상 URL요청을 감시하고 요청이 있으면 사용자의 인증을 진행함 |
| DefaultLoginPageGeneratingFilter | 폼기반 또는 OpenID 기반 인증에 사용하는 가상URL에 대한 요청을 감시하고 로그인 폼 기능을 수행하는데 필요한 HTML을 생성함 |
| BasicAuthenticationFilter | HTTP 기본 인증 헤더를 감시하고 이를 처리함 |
| RequestCacheAwareFilter | 로그인 성공 이후 인증 요청에 의해 가로채어진 사용자의 원래 요청을 재구성하는데 사용됨 SecurityContextHolderAwareRequestFilter HttpServletRequest를 HttpServletRequestWrapper를 상속하는 하위 클래스(SecurityContextHolderAwareRequestWrapper)로 감싸서 필터 체인상 하단에 위치한 요청 프로세서에 추가 컨텍스트를 제공함 |
| AnonymousAuthenticationFilter | 이 필터가 호출되는 시점까지 사용자가 아직 인증을 받지 못했다면 요청 관련 인증 토큰에서 사용자가 익명 사용자로 나타나게 됨 |
| SessionManagementFilter | 인증된 주체를 바탕으로 세션 트래킹을 처리해 단일 주체와 관련한 모든 세션들이 트래킹되도록 도움 |
| ExceptionTranslationFilter | 이 필터는 보호된 요청을 처리하는 동안 발생할 수 있는 기대한 예외의 기본 라우팅과 위임을 처리함 |
| FilterSecurityInterceptor | 이 필터는 권한부여와 관련한 결정을 AccessDecisionManager에게 위임해 권한부여 결정 및 접근 제어 결정을 쉽게 만들어 줌 |
사실 스프링 시큐리티는 많은 필터들로 구성되어 있어 처음에 봤을 때 복잡하게 느껴질 수 있습니다. 각 필터별로 어떤 역할을 하는지 꼼꼼하게 보고, 스프링시큐리티를 활용한 간단한 로그인 기능을 직접 구현해보시면 전체적인 흐름을 이해하시는데 도움이 될 것 같습니다.
2. Spring Security 모듈
[ Spring Security 주요 모듈 ]
Spring Security의 주요 모듈은 아래와 같이 구성되며 각 항목들에 대해서 간단히 살펴보도록 하자.

[ SecurityContextHolder ]
SecurityContextHolder는 보안 주체의 세부 정보를 포함하여 응용프래그램의 현재 보안 컨텍스트에 대한 세부 정보가 저장된다. SecurityContextHolder는 기본적으로 SecurityContextHolder.MODE_INHERITABLETHREADLOCAL 방법과SecurityContextHolder.MODE_THREADLOCAL 방법을 제공한다.
[ SecurityContext ]
Authentication을 보관하는 역할을 하며, SecurityContext를 통해 Authentication 객체를 꺼내올 수 있다.
[ Authentication ]
Authentication는 현재 접근하는 주체의 정보와 권한을 담는 인터페이스이다. Authentication 객체는 Security Context에 저장되며, SecurityContextHolder를 통해 SecurityContext에 접근하고, SecurityContext를 통해 Authentication에 접근할 수 있다.
public interface Authentication extends Principal, Serializable {
    // 현재 사용자의 권한 목록을 가져옴
    Collection<? extends GrantedAuthority> getAuthorities();

    // credentials(주로 비밀번호)을 가져옴
    Object getCredentials();

    Object getDetails();

    // Principal 객체를 가져옴.
    Object getPrincipal();

    // 인증 여부를 가져옴
    boolean isAuthenticated();

    // 인증 여부를 설정함
    void setAuthenticated(boolean isAuthenticated) throws IllegalArgumentException;
}
[ UsernamePasswordAuthenticationToken ]
UsernamePasswordAuthenticationToken은 Authentication을 implements한 AbstractAuthenticationToken의 하위 클래스로, User의 ID가 Principal 역할을 하고, Password가 Credential의 역할을 한다. UsernamePasswordAuthenticationToken의 첫 번째 생성자는 인증 전의 객체를 생성하고, 두번째 생성자는 인증이 완려된 객체를 생성한다.
public class UsernamePasswordAuthenticationToken extends AbstractAuthenticationToken {
    // 주로 사용자의 ID에 해당함
    private final Object principal;
    // 주로 사용자의 PW에 해당함
    private Object credentials;

    // 인증 완료 전의 객체 생성
    public UsernamePasswordAuthenticationToken(Object principal, Object credentials) {
		super(null);
		this.principal = principal;
		this.credentials = credentials;
		setAuthenticated(false);
	}

    // 인증 완료 후의 객체 생성
    public UsernamePasswordAuthenticationToken(Object principal, Object credentials,
			Collection<? extends GrantedAuthority> authorities) {
		super(authorities);
		this.principal = principal;
		this.credentials = credentials;
		super.setAuthenticated(true); // must use super, as we override
	}
}


public abstract class AbstractAuthenticationToken implements Authentication, CredentialsContainer {
}
[ AuthenticationProvider ]
AuthenticationProvider에서는 실제 인증에 대한 부분을 처리하는데, 인증 전의 Authentication객체를 받아서 인증이 완료된 객체를 반환하는 역할을 한다. 아래와 같은 AuthenticationProvider 인터페이스를 구현해서 Custom한 AuthenticationProvider을 작성해서 AuthenticationManager에 등록하면 된다.
public interface AuthenticationProvider {

	// 인증 전의 Authenticaion 객체를 받아서 인증된 Authentication 객체를 반환
    Authentication authenticate(Authentication var1) throws AuthenticationException;

    boolean supports(Class<?> var1);

}
[ Authentication Manager ]
인증에 대한 부분은 SpringSecurity의 AuthenticatonManager를 통해서 처리하게 되는데, 실질적으로는 AuthenticationManager에 등록된 AuthenticationProvider에 의해 처리된다. 인증이 성공하면 2번째 생성자를 이용해 인증이 성공한(isAuthenticated=true) 객체를 생성하여 Security Context에 저장한다. 그리고 인증 상태를 유지하기 위해 세션에 보관하며, 인증이 실패한 경우에는 AuthenticationException를 발생시킨다.
public interface AuthenticationManager {
	Authentication authenticate(Authentication authentication)
		throws AuthenticationException;
}
AuthenticationManager를 implements한 ProviderManager는 실제 인증 과정에 대한 로직을 가지고 있는 AuthenticaionProvider를 List로 가지고 있으며, ProividerManager는 for문을 통해 모든 provider를 조회하면서 authenticate 처리를 한다.
public class ProviderManager implements AuthenticationManager, MessageSourceAware,
InitializingBean {
    public List<AuthenticationProvider> getProviders() {
		return providers;
	}
    public Authentication authenticate(Authentication authentication)
			throws AuthenticationException {
		Class<? extends Authentication> toTest = authentication.getClass();
		AuthenticationException lastException = null;
		Authentication result = null;
		boolean debug = logger.isDebugEnabled();
        //for문으로 모든 provider를 순회하여 처리하고 result가 나올 때까지 반복한다.
		for (AuthenticationProvider provider : getProviders()) {
            ....
			try {
				result = provider.authenticate(authentication);

				if (result != null) {
					copyDetails(authentication, result);
					break;
				}
			}
			catch (AccountStatusException e) {
				prepareException(e, authentication);
				// SEC-546: Avoid polling additional providers if auth failure is due to
				// invalid account status
				throw e;
			}
            ....
		}
		throw lastException;
	}
}
위에서 설명한 ProviderManager에 우리가 직접 구현한 CustomAuthenticationProvider를 등록하는 방법은 WebSecurityConfigurerAdapter를 상속해 만든 SecurityConfig에서 할 수 있다. WebSecurityConfigurerAdapter의 상위 클래스에서는 AuthenticationManager를 가지고 있기 때문에 우리가 직접 만든 CustomAuthenticationProvider를 등록할 수 있다.
@Configuration
@EnableWebSecurity
public class SecurityConfig extends WebSecurityConfigurerAdapter {

    @Bean
    public AuthenticationManager getAuthenticationManager() throws Exception {
        return super.authenticationManagerBean();
    }

    @Bean
    public CustomAuthenticationProvider customAuthenticationProvider() throws Exception {
        return new CustomAuthenticationProvider();
    }

    @Override
    protected void configure(AuthenticationManagerBuilder auth) throws Exception {
        auth.authenticationProvider(customAuthenticationProvider());
    }
}
[ UserDetails ]
인증에 성공하여 생성된 UserDetails 객체는 Authentication객체를 구현한 UsernamePasswordAuthenticationToken을 생성하기 위해 사용된다. UserDetails 인터페이스를 살펴보면 아래와 같이 정보를 반환하는 메소드를 가지고 있다. UserDetails 인터페이스의 경우 직접 개발한 UserVO 모델에 UserDetails를 implements하여 이를 처리하거나 UserDetailsVO에 UserDetails를 implements하여 처리할 수 있다.
public interface UserDetails extends Serializable {

    Collection<? extends GrantedAuthority> getAuthorities();

    String getPassword();

    String getUsername();

    boolean isAccountNonExpired();

    boolean isAccountNonLocked();

    boolean isCredentialsNonExpired();

    boolean isEnabled();

}
[ UserDetailsService ]
UserDetailsService 인터페이스는 UserDetails 객체를 반환하는 단 하나의 메소드를 가지고 있는데, 일반적으로 이를 구현한 클래스의 내부에 UserRepository를 주입받아 DB와 연결하여 처리한다. UserDetails 인터페이스는 아래와 같다.
public interface UserDetailsService {

    UserDetails loadUserByUsername(String var1) throws UsernameNotFoundException;

}
[ Password Encoding ]
AuthenticationManagerBuilder.userDetailsService().passwordEncoder() 를 통해 패스워드 암호화에 사용될 PasswordEncoder 구현체를 지정할 수 있다.
@Override
protected void configure(AuthenticationManagerBuilder auth) throws Exception {
	// TODO Auto-generated method stub
	auth.userDetailsService(userDetailsService).passwordEncoder(passwordEncoder());
}

@Bean
public PasswordEncoder passwordEncoder(){
	return new BCryptPasswordEncoder();
}
[ GrantedAuthority ]
GrantAuthority는 현재 사용자(principal)가 가지고 있는 권한을 의미한다. ROLE_ADMIN나 ROLE_USER와 같이 ROLE_*의 형태로 사용하며, 보통 "roles" 이라고 한다. GrantedAuthority 객체는 UserDetailsService에 의해 불러올 수 있고, 특정 자원에 대한 권한이 있는지를 검사하여 접근 허용 여부를 결정한다.
[Spring Boot] Spring Security 처리 과정 및 구현 예제
이번에는 Spring Security가 어떤 과정으로 Authentication 처리를 하는지, 그리고 실제로 어떻게 구현하는지 알아보도록 하자.
1. Spring Security 처리 과정

Spring Security 아키텍쳐는 위와 같으며 각각의 처리 과정에 대해서 자세히 알아보도록 하자.(아래에서 설명하는 내용은 Session을 활용한 Spring Security의 구현 방식으로, Session과 Token 기반의 구현방식에 대해서는 여기를 참고하세요! )
[ 0. 사전 세팅 ]
먼저 프로젝트에서 사용할 Dependency들을 build.gradle에 추가해준다.
dependencies {
    implementation 'org.mariadb.jdbc:mariadb-java-client'
    implementation 'org.springframework.boot:spring-boot-starter-data-jpa'

    implementation 'org.springframework.boot:spring-boot-starter-security'

    implementation 'org.springframework.boot:spring-boot-starter-thymeleaf'
    implementation 'org.springframework.boot:spring-boot-starter-web'

    compileOnly 'org.projectlombok:lombok'
    annotationProcessor 'org.projectlombok:lombok'

    testImplementation('org.springframework.boot:spring-boot-starter-test') {
        exclude group: 'org.junit.vintage', module: 'junit-vintage-engine'
    }
    testImplementation 'org.springframework.security:spring-security-test'
}
그리고 정적 자원을 제공하는 클래스를 생성하여 아래와 같이 설정한다.
@Configuration
public class WebMvcConfig implements WebMvcConfigurer {

    private static final String[] CLASSPATH_RESOURCE_LOCATIONS = { "classpath:/static/", "classpath:/public/", "classpath:/",
            "classpath:/resources/", "classpath:/META-INF/resources/", "classpath:/META-INF/resources/webjars/" };

    @Override
    public void addViewControllers(ViewControllerRegistry registry) {
        // /에 해당하는 url mapping을 /common/test로 forward한다.
        registry.addViewController( "/" ).setViewName( "forward:/index" );
        // 우선순위를 가장 높게 잡는다.
        registry.setOrder(Ordered.HIGHEST_PRECEDENCE);
    }

    @Override
    public void addResourceHandlers(ResourceHandlerRegistry registry) {
        registry.addResourceHandler("/**").addResourceLocations(CLASSPATH_RESOURCE_LOCATIONS);
    }

}
그리고 SpringSecurity에 대한 기본적인 설정들을 추가한다. SpringSecurity에 대한 설정 클래스에서는
- configure 메소드를 통해 정적 자원들에 대해서는 Security를 적용하지 않음을 추가한다.
- configure 메소드를 통해 어떤 요청에 대해서는 로그인을 요구하고, 어떤 요청에 대해서 로그인을 요구하지 않을지 설정한다.
- form 기반의 로그인을 활용하는 경우 로그인 URL, 로그인 성공시 전달할 URL, 로그인 실패 URL 등에 대해서 설정한다.
@Configuration
@EnableWebSecurity
public class WebSecurityConfig extends WebSecurityConfigurerAdapter {

    // 정적 자원에 대해서는 Security 설정을 적용하지 않음.
    @Override
    public void configure(WebSecurity web) {
        web.ignoring().requestMatchers(PathRequest.toStaticResources().atCommonLocations());
    }

    @Override
    protected void configure(HttpSecurity http) throws Exception {
        http.csrf().disable().authorizeRequests()
                // /about 요청에 대해서는 로그인을 요구함
                .antMatchers("/about").authenticated()
                // /admin 요청에 대해서는 ROLE_ADMIN 역할을 가지고 있어야 함
                .antMatchers("/admin").hasRole("ADMIN")
                // 나머지 요청에 대해서는 로그인을 요구하지 않음
                .anyRequest().permitAll()
                .and()
                // 로그인하는 경우에 대해 설정함
            .formLogin()
                // 로그인 페이지를 제공하는 URL을 설정함
                .loginPage("/user/loginView")
                // 로그인 성공 URL을 설정함
                .successForwardUrl("/index")
                // 로그인 실패 URL을 설정함
                .failureForwardUrl("/index")
                .permitAll()
                .and()
                .addFilterBefore(customAuthenticationFilter(), UsernamePasswordAuthenticationFilter.class);
    }

    @Bean
    public BCryptPasswordEncoder bCryptPasswordEncoder() {
        return new BCryptPasswordEncoder();
    }

}
이번 예제에서는 /about 에 대해서는 로그인이 성공한 경우에만 접근가능하고, /admin에 대해서는 로그인 후에 ROLE_ADMIN 역할을 갖고 있는 경우에만 접근가능하도록 설정해준다.
[ 1. 로그인 요청 ]
사용자는 로그인 하기 위해 아이디와 비밀번호를 입력해서 로그인 요청을 하게 된다. 이번에 작성하는 예제에서는 Form기반으로 요청을 보내는 상황이다.
[ 2. UserPasswordAuthenticationToken 발급 ]
전송이 오면 AuthenticationFilter로 요청이 먼저 오게 되고, 아이디와 비밀번호를 기반으로 UserPasswordAuthenticationToken을 발급해주어야 한다. 프론트 단에서 유효성 검사를 하겠지만, 안전을 위해서 다시 한번 아이디와 패스워드의 유효성 검사를 해주는 것이 좋지만 아래의 예제에서는 생략하도록 하겠다.(아이디나 비밀번호의 null 여부 등) 해당 Filter를 직접 구현하면 아래와 같다.
@Log4j2
public class CustomAuthenticationFilter extends UsernamePasswordAuthenticationFilter {

    public CustomAuthenticationFilter(AuthenticationManager authenticationManager) {
        super.setAuthenticationManager(authenticationManager);
    }

    @Override
    public Authentication attemptAuthentication(HttpServletRequest request, HttpServletResponse response) throws AuthenticationException {
        UsernamePasswordAuthenticationToken authRequest = new UsernamePasswordAuthenticationToken(request.getParameter("userEmail"), request.getParameter("userPw"));
        setDetails(request, authRequest);
        return this.getAuthenticationManager().authenticate(authRequest);
    }

}
이렇게 직접 제작한 Filter를 이제 적용시켜야 하므로 UsernamePasswordAuthenticationFilter 필터 이전에 적용시켜야 한다. 그리고 해당 CustomAuthenticationFilter가 수행된 후에 처리될 Handler 역시 Bean으로 등록하고 CustomAuthenticationFilter의 핸들러로 추가해주어야 하는데, 해당 코드들은 WebSecurityConfig에 아래와 같이 추가해줄 수 있다.
public class CustomLoginSuccessHandler extends SavedRequestAwareAuthenticationSuccessHandler {

    @Override
    public void onAuthenticationSuccess(HttpServletRequest request, HttpServletResponse response,
                                        Authentication authentication) throws IOException {
        SecurityContextHolder.getContext().setAuthentication(authentication);
        response.sendRedirect("/about");
    }

}
CustomLoginSuccessHandler는 AuthenticationProvider를 통해 인증이 성공될 경우 처리되는데, 이번 예제에서는 /about 요청으로 redirect되도록 해주었다. 그리고 토큰을 사용하지 않고 세션을 활용하는 지금 예제같은 경우에는 성공하여 반환된 Authentication 객체를 SecurityContextHolder의 Contetx에 저장해주어야 한다. 나중에 사용자의 정보를 꺼낼 경우에도 SecurityContextHolder의 context에서 조회하면 된다.
@Configuration
@EnableWebSecurity
public class WebSecurityConfig extends WebSecurityConfigurerAdapter {

    // 정적 자원에 대해서는 Security 설정을 적용하지 않음.
    @Override
    public void configure(WebSecurity web) {
        web.ignoring().requestMatchers(PathRequest.toStaticResources().atCommonLocations());
    }

    @Override
    protected void configure(HttpSecurity http) throws Exception {
        http.csrf().disable().authorizeRequests()
                // /about 요청에 대해서는 로그인을 요구함
                .antMatchers("/about").authenticated()
                // /admin 요청에 대해서는 ROLE_ADMIN 역할을 가지고 있어야 함
                .antMatchers("/admin").hasRole("ADMIN")
                // 나머지 요청에 대해서는 로그인을 요구하지 않음
                .anyRequest().permitAll()
                .and()
                // 로그인하는 경우에 대해 설정함
            .formLogin()
                // 로그인 페이지를 제공하는 URL을 설정함
                .loginPage("/user/loginView")
                // 로그인 성공 URL을 설정함
                .successForwardUrl("/index")
                // 로그인 실패 URL을 설정함
                .failureForwardUrl("/index")
                .permitAll()
                .and()
                .addFilterBefore(customAuthenticationFilter(), UsernamePasswordAuthenticationFilter.class);
    }

    @Bean
    public BCryptPasswordEncoder bCryptPasswordEncoder() {
        return new BCryptPasswordEncoder();
    }

    @Bean
    public CustomAuthenticationFilter customAuthenticationFilter() throws Exception {
        CustomAuthenticationFilter customAuthenticationFilter = new CustomAuthenticationFilter(authenticationManager());
        customAuthenticationFilter.setFilterProcessesUrl("/user/login");
        customAuthenticationFilter.setAuthenticationSuccessHandler(customLoginSuccessHandler());
        customAuthenticationFilter.afterPropertiesSet();
        return customAuthenticationFilter;
    }

    @Bean
    public CustomLoginSuccessHandler customLoginSuccessHandler() {
        return new CustomLoginSuccessHandler();
    }

}
CustomAuthenticationFilter를 빈으로 등록하는 과정에서 UserName파라미터와 UserPassword파라미터를 설정할 수 있다. 이러한 과정을 거치면 UsernamePasswordToken이 발급되게 된다.
[ 3. UsernamePasswordToken을 Authentication Manager에게 전달 ]
AuthenticationFilter는 생성한 UsernamePasswordToken을 AuthenticationManager에게 전달한다. AuthenticationManager은 실제로 인증을 처리할 여러개의 AuthenticationProvider를 가지고 있다.
[ 4. UsernamePasswordToken을 Authentication Provider에게 전달 ]
AuthenticationManager는 전달받은 UsernamePasswordToken을 순차적으로 AuthenticaionProvider들에게 전달하여 실제 인증의 과정을 수행해야 하며, 실제 인증에 대한 부분은 authenticate 함수에 작성을 해주어야 한다. SpringSecurity에서는 Username으로 DB에서 데이터를 조회한 다음에, 비밀번호의 일치 여부를 검사하는 방식으로 작동을 한다. 그렇기 때문에 먼저 UsernamePasswordToken 토큰으로부터 아이디를 조회해야 하고 그 코드는 아래와 같다.
@RequiredArgsConstructor
@Log4j2
public class CustomAuthenticationProvider implements AuthenticationProvider {

    @Override
    public Authentication authenticate(Authentication authentication) throws AuthenticationException {
        UsernamePasswordAuthenticationToken token = (UsernamePasswordAuthenticationToken) authentication;
        // AuthenticaionFilter에서 생성된 토큰으로부터 아이디와 비밀번호를 조회함
        String userEmail = token.getName();

    }

    @Override
    public boolean supports(Class<?> authentication) {
        return authentication.equals(UsernamePasswordAuthenticationToken.class);
    }

}
[ 5. UserDetailsService로 조회할 아이디를 전달 ]
AuthenticationProvider에서 아이디를 조회하였으면, UserDetailsService로부터 아이디를 기반으로 데이터를 조회해야 한다. UserDetailsService는 인터페이스이기 때문에 이를 implements한 클래스를 작성해주어야 한다. 실제 반환값을 작성하는 부분은 7번에서 다룬다.
import java.util.Collections;

@RequiredArgsConstructor
@Service
public class UserDetailsServiceImpl implements UserDetailsService {

    private final UserRepository userRepository;

    @Override
    public UserDetailsVO loadUserByUsername(String userEmail) {

    }

}
[ 6. 아이디를 기반으로 DB에서 데이터 조회 ]
전달받은 아이디를 기반으로 DB에서 조회하는 구현체는 우리가 직접 개발한 UserVO일 것이고, UserDetailsService의 반환값은 UserDetails 인터페이스이기 때문에 이를 implements하여 구현한 UserDetailsVO를 아래와 같이 작성할 수 있다.
@RequiredArgsConstructor
@Getter
public class UserDetailsVO implements UserDetails {

    @Delegate
    private final UserVO userVO;
    private final Collection<? extends GrantedAuthority> authorities;

    @Override
    public Collection<? extends GrantedAuthority> getAuthorities() {
        return authorities;
    }

    @Override
    public String getPassword() {
        return userVO.getUserPw();
    }

    @Override
    public String getUsername() {
        return userVO.getUserEmail();
    }

    @Override
    public boolean isAccountNonExpired() {
        return userVO.getIsEnable();
    }

    @Override
    public boolean isAccountNonLocked() {
        return userVO.getIsEnable();
    }

    @Override
    public boolean isCredentialsNonExpired() {
        return userVO.getIsEnable();
    }

    @Override
    public boolean isEnabled() {
        return userVO.getIsEnable();
    }
}
[ 7. 아이디를 기반으로 조회한 결과를 반환 ]
아이디를 기반으로 조회한 결과를 반환하기 위해서는 위에서 작성하던 UserDetailsServiceImpl을 마무리해주어야 하는데, 그 전에 사용자의 아이디를 기반으로 데이터가 조회하지 않았을 경우 처리해주기 위한 Exception 클래스를 추가해주어야 한다.
public class UserNotFoundException extends RuntimeException{

    public UserNotFoundException(String userEmail){
        super(userEmail + " NotFoundException");
    }

}
그리고 조회한 결과를 CustomAuthenticaionProvider로 반환하는 UserDetailsServceImpl을 마무리해주면 아래와 같다.
@RequiredArgsConstructor
@Service
public class UserDetailsServiceImpl implements UserDetailsService {

    private final UserRepository userRepository;

    @Override
    public UserDetailsVO loadUserByUsername(String userEmail) {
        return userRepository.findByUserEmail(userEmail).map(u -> new UserDetailsVO(u, Collections.singleton(new SimpleGrantedAuthority(u.getRole().getValue())))).orElseThrow(() -> new UserNotFoundException(userEmail));
    }

}
위의 예제에서는 UserRepository로부터 조회한 결과를 Optional로 반환하고 있기 때문에 map 함수를 이용해서 새로운 UserDetailsVO 객체로 생성하여 반환하고 있다. (만약 Optional에 대해 잘 모르신다면 여기를 참고해주세요!)
[ 8. 인증 처리 후 인증된 토큰을 AuthenticationManager에게 반환 ]
이제 CustomAuthenticationProvider에서 UserDetailsService를 통해 조회한 정보와 입력받은 비밀번호가 일치하는지 확인하여, 일치한다면 인증된 토큰을 생성하여 반환해주어야 한다. DB에 저장된 사용자 비밀번호는 암호화가 되어있기 때문에, 입력으로부터 들어온 비밀번호를 PasswordEncoder를 통해 암호화하여 DB에서 조회한 사용자의 비밀번호화 매칭되는지 확인해주어야 한다. 만약 비밀번호가 매칭되지 않는 경우에는 BadCredentialsException을 발생시켜 처리해준다.
@RequiredArgsConstructor
@Log4j2
public class CustomAuthenticationProvider implements AuthenticationProvider {

    private final UserDetailsService userDetailsService;
    private final BCryptPasswordEncoder passwordEncoder;

    @Override
    public Authentication authenticate(Authentication authentication) throws AuthenticationException {
        UsernamePasswordAuthenticationToken token = (UsernamePasswordAuthenticationToken) authentication;
        // AuthenticaionFilter에서 생성된 토큰으로부터 아이디와 비밀번호를 조회함
        String userEmail = token.getName();
        String userPw = (String) token.getCredentials();
        // UserDetailsService를 통해 DB에서 아이디로 사용자 조회
        UserDetailsVO userDetailsVO = (UserDetailsVO) userDetailsService.loadUserByUsername(userEmail);

        if (!passwordEncoder.matches(userPw, userDetailsVO.getPassword())) {
            throw new BadCredentialsException(userDetailsVO.getUsername() + "Invalid password");
        }

        return new UsernamePasswordAuthenticationToken(userDetailsVO, userPw, userDetailsVO.getAuthorities());
    }

    @Override
    public boolean supports(Class<?> authentication) {
        return authentication.equals(UsernamePasswordAuthenticationToken.class);
    }

}
위와 같이 완성된 CustomAuthenticaionProvider를 이제 Bean으로 등록해주어야 하는데, 이것을 WebSecurityConfig에 작성하면 아래와 같다.
@Configuration
@EnableWebSecurity
@RequiredArgsConstructor
public class WebSecurityConfig extends WebSecurityConfigurerAdapter {

    private final UserDetailsService userDetailsService;

    // 정적 자원에 대해서는 Security 설정을 적용하지 않음.
    @Override
    public void configure(WebSecurity web) {
        web.ignoring().requestMatchers(PathRequest.toStaticResources().atCommonLocations());
    }

    @Override
    protected void configure(HttpSecurity http) throws Exception {
        http.csrf().disable().authorizeRequests()
                // /about 요청에 대해서는 로그인을 요구함
                .antMatchers("/about").authenticated()
                // /admin 요청에 대해서는 ROLE_ADMIN 역할을 가지고 있어야 함
                .antMatchers("/admin").hasRole("ADMIN")
                // 나머지 요청에 대해서는 로그인을 요구하지 않음
                .anyRequest().permitAll()
                .and()
                // 로그인하는 경우에 대해 설정함
            .formLogin()
                // 로그인 페이지를 제공하는 URL을 설정함
                .loginPage("/user/loginView")
                // 로그인 성공 URL을 설정함
                .successForwardUrl("/index")
                // 로그인 실패 URL을 설정함
                .failureForwardUrl("/index")
                .permitAll()
                .and()
                .addFilterBefore(customAuthenticationFilter(), UsernamePasswordAuthenticationFilter.class);
    }

    @Bean
    public BCryptPasswordEncoder bCryptPasswordEncoder() {
        return new BCryptPasswordEncoder();
    }

    @Bean
    public CustomAuthenticationFilter customAuthenticationFilter() throws Exception {
        CustomAuthenticationFilter customAuthenticationFilter = new CustomAuthenticationFilter(authenticationManager());
        customAuthenticationFilter.setFilterProcessesUrl("/user/login");
        customAuthenticationFilter.setAuthenticationSuccessHandler(customLoginSuccessHandler());
        customAuthenticationFilter.afterPropertiesSet();
        return customAuthenticationFilter;
    }

    @Bean
    public CustomLoginSuccessHandler customLoginSuccessHandler() {
        return new CustomLoginSuccessHandler();
    }

    @Bean
    public CustomAuthenticationProvider customAuthenticationProvider() {
        return new CustomAuthenticationProvider(bCryptPasswordEncoder());
    }

    @Override
    public void configure(AuthenticationManagerBuilder authenticationManagerBuilder) {
        authenticationManagerBuilder.authenticationProvider(customAuthenticationProvider());
    }

}
[ 9. 인증된 토큰을 AuthenticationFilter에게 전달 ]
AuthenticaitonProvider에서 인증이 완료된 UsernamePasswordAuthenticationToken을 AuthenticationFilter로 반환하고, AuthenticationFilter에서는 LoginSuccessHandler로 전달한다.
[ 10. 인증된 토큰을 SecurityContextHolder에 저장 ]
LoginSuccessHandler로 넘어온 Authentication 객체를 SecurityContextHolder에 저장하면 인증 과정이 끝나게 된다.
로그인이 성공하고 나면 SecurityContextHolder라는 세션을 활용하여 저장하기 때문에 1번만 로그인 하면 로그인이 필요한 페이지들에 바로 접근할 수 있다.
2. Spring Security 처리 과정 요약
[ Spring Security 처리 과정 요약 ]

- 사용자가 아이디 비밀번호로 로그인을 요청함
- AuthenticationFilter에서 UsernamePasswordAuthenticationToken을 생성하여 AuthenticaionManager에게 전달
- AuthenticaionManager는 등록된 AuthenticaionProvider(들)을 조회하여 인증을 요구함
- AuthenticaionProvider는 UserDetailsService를 통해 입력받은 아이디에 대한 사용자 정보를 DB에서 조회함
- 입력받은 비밀번호를 암호화하여 DB의 비밀번호화 매칭되는 경우 인증이 성공된 UsernameAuthenticationToken을 생성하여 AuthenticaionManager로 반환함
- AuthenticaionManager는 UsernameAuthenticaionToken을 AuthenticaionFilter로 전달함
- AuthenticationFilter는 전달받은 UsernameAuthenticationToken을 LoginSuccessHandler로 전송하고, SecurityContextHolder에 저장함
3. Spring Security 샘플 코드 및 실행
[ Spring Security 예제 실행 방법 ]
- https://github.com/MangKyu/SpringSecurity-Example/tree/formbased으로부터 소스를 클론받는다.
- CREATE DATABASE security DEFAULT CHARSET UTF8; 으로 데이터베이스를 생성한다.
- application.properties에서 DB username과 password를 개인에 맞게 변경해준다.
- 서버를 실행시킨다.
- http://localhost:8081/user/init 로 접속해서 사용자 데이터를 초기화 한다.
- index 페이지에 접속하여 실행한다.
Spring Security 사용하기
<dependency>
   <groupId>org.springframework.boot</groupId>
   <artifactId>spring-boot-starter-security</artifactId>
</dependency>
실습 코드로 이해해 보기
API 만들기
package com.example.demo.student;

public class Student {

    private final Integer studentId;
    private final String studentName;

    public Student(Integer studentId,
                   String studentName) {
        this.studentId = studentId;
        this.studentName = studentName;
    }

    public Integer getStudentId() {
        return studentId;
    }

    public String getStudentName() {
        return studentName;
    }

    @Override
    public String toString() {
        return "Student{" +
                "studentId=" + studentId +
                ", studentName='" + studentName + '\'' +
                '}';
    }
}
package com.example.demo.student;
import org.springframework.web.bind.annotation.GetMapping;
import org.springframework.web.bind.annotation.PathVariable;
import org.springframework.web.bind.annotation.RequestMapping;
import org.springframework.web.bind.annotation.RestController;
import java.util.Arrays;
import java.util.List;
@RestController
@RequestMapping("api/v1/students")
public class StudentController {
private static final List<Student> STUDENTS = Arrays.asList(
new Student(1, "James Bond"),
new Student(2, "Maria Jones"),
new Student(3, "Anna Smith")
);
@GetMapping(path = "{studentId}")
public Student getStudent(@PathVariable("studentId") Integer studentId) {
return STUDENTS.stream()
.filter(student -> studentId.equals(student.getStudentId()))
.findFirst()
.orElseThrow(() -> new IllegalStateException(
"Student " + studentId + " does not exists"
));
}
}
인메모리 유저 설정해주기
package com.example.demo.student;

import org.springframework.security.access.prepost.PreAuthorize;
import org.springframework.web.bind.annotation.*;

import java.util.Arrays;
import java.util.List;

@RestController
@RequestMapping("management/api/v1/students")
public class StudentManagementController {

    private static final List<Student> STUDENTS = Arrays.asList(
            new Student(1, "James Bond"),
            new Student(2, "Maria Jones"),
            new Student(3, "Anna Smith")
    );

//    hasRole('ROLE_') hasAnyRole('ROLE_') hasAuthority('permission') hasAnyAuthority('permission')

    @GetMapping
    @PreAuthorize("hasAnyRole('ROLE_ADMIN', 'ROLE_ADMINTRAINEE')")
    public List<Student> getAllStudents() {
        System.out.println("getAllStudents");
        return STUDENTS;
    }

    @PostMapping
    @PreAuthorize("hasAuthority('student:write')")
    public void registerNewStudent(@RequestBody Student student) {
        System.out.println("registerNewStudent");
        System.out.println(student);
    }

    @DeleteMapping(path = "{studentId}")
    @PreAuthorize("hasAuthority('student:write')")
    public void deleteStudent(@PathVariable("studentId") Integer studentId) {
        System.out.println("deleteStudent");
        System.out.println(studentId);
    }

    @PutMapping(path = "{studentId}")
    @PreAuthorize("hasAuthority('student:write')")
    public void updateStudent(@PathVariable("studentId") Integer studentId, @RequestBody Student student) {
        System.out.println("updateStudent");
        System.out.println(String.format("%s %s", studentId, student));
    }
}
Spring Security 가 제공하는 form based Authentication


기본 Auth 의 과정

Reference
출처: https://mangkyu.tistory.com/76 [MangKyu's Diary:티스토리]
https://daddyprogrammer.org/post/636/springboot2-springsecurity-authentication-authorization/
https://www.youtube.com/watch?v=her_7pa0vrg
'Spring Security' 카테고리의 다른 글
| 스프링 시큐리티 설명 링크 모음 (0) | 2022.07.05 |
|---|---|
| [Spring Security] 스프링시큐리티 시작하기 / 기본세팅 (0) | 2022.07.05 |
